
Monday, April 30, 2012
OPI Vintage Minnie Mouse Collection
Today I have the OPI Vintage Minnie Mouse collection to show you. The collection contains three pink/red polishes and one glitter top coat that Minnie Mouse herself would approve of. Before I write something else silly, let's get to the photos...


Friday, April 27, 2012
Born Pretty Store Dried Flowers Manicure and Review
I received an offer from The Born Pretty Store to review their nail art Dried Flowers. I have been wanting to try these flowers for a while so I couldn't resist. The package contains 12 different flowers, each one in it's own little plastic jar.


Thursday, April 26, 2012
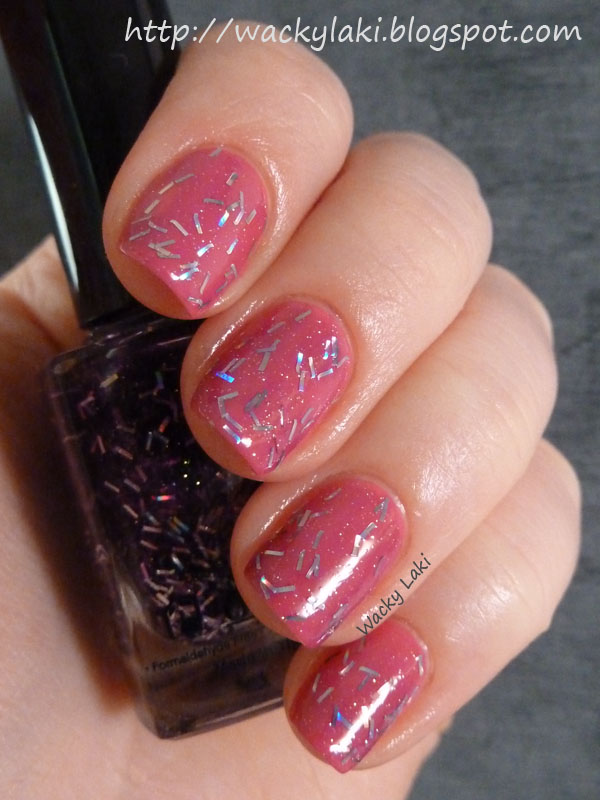
Curious Puppy Prints...
I often get the urge to try a gradient with similar colors within a collection. Just as often it doesn't work out as I imagined since the colors are too similar. Such was the case with Color Club Incognito and Give Me a Hint. Give Me a Hint turned out to be too light and sheer to create a nice gradient. Rather than give up and start over, I added Barielle Tight Knit into the mix to darken up the tip of the gradient.


Tuesday, April 24, 2012
One Stroke Flowers over Color Club Get a Clue
I decided that Color Club Get a Clue would provide a lovely background for my first one stroke flower attempt. I have seen lots of tutorials on the technique, but have been hesitating to actually try it. Turns out is it not as scary as one might have imagined. I used white and periwinkle blue acrylic paint along with a flat angled brush to create the flowers...


Monday, April 23, 2012
Color Club - Alter Ego: Reveal Your Mystery Collection
Thank you so much to everyone that stopped by this weekend to wish this blog a happy 1st birthday. It means so much to me!
Today I have for you swatches of half of Color Club Alter Ego collection. The collection consists of two sets of six colors. One half are the light colors in a set named Reveal Your Mystery. The other half are dark colors and the set is named Keep it Under Cover. I only own the Reveal Your Mystery set of the collection and it is what I'll be sharing with you today. The collection was released in Spring 2011 and just like all of the other Color Club collections that I own, I'm about a year behind in getting to play with them, but better late than never...

Today I have for you swatches of half of Color Club Alter Ego collection. The collection consists of two sets of six colors. One half are the light colors in a set named Reveal Your Mystery. The other half are dark colors and the set is named Keep it Under Cover. I only own the Reveal Your Mystery set of the collection and it is what I'll be sharing with you today. The collection was released in Spring 2011 and just like all of the other Color Club collections that I own, I'm about a year behind in getting to play with them, but better late than never...

Friday, April 20, 2012
Wacky Laki Turns One!
It was exactly one year ago on April 20th that I wrote my first Wacky Laki post. I still remember trying to pick out a name for the blog and with my boyfriend's help we came up with Wacky Laki. In case you were wondering what the name means... Laki (лаки) means polishes in Russian and it just happens to rhyme with Wacky. So there you have it :)

(source)
Thursday, April 19, 2012
piCture pOlish Tiffany Boxed Up
The last piCture pOlish in my collection is Tiffany. It carries the very appropriate and cute tag line of "diamonds with breakfast!" With a name like that, there wasn't a doubt in my mind that I wanted to put a ribbon and bow on this manicure.


Tuesday, April 17, 2012
Tutorial Tuesday: DIY Cutout Decals
As promised, I have a tutorial for the dress inspired manicure from last Friday. This is made with a technique that I have been playing with for a while and involves nothing more than some nail polish and a ziplock bag. I think the possibilities with this technique are endless. These cutout decals are just one example of what you can do...
Supplies

Insutrctions
I hope you enjoyed this tutorial! I would love to know what you think of it...
As always, if you try this or any of my other tutorials/manicures, I would love to see your creations :)
Thanks for looking!
Anutka :)
Supplies
- Nail polish in two contrasting colors
(used here Wet 'n Wild I Need a Refresh-Mint and French White Creme) - Ziplock bag
- Scissors
- Cuticle Nipper

Insutrctions
- Using white nail polish, paint a rectangle about 1.5x larger than your nail on the ziplock bag.
- Apply a second coat if needed to reach full opacity.
- Allow to dry completely (I usually let this dry overnight) - Peel the sheet of nail polish off the ziplock bag. Sometimes it helps to use tweezers to get it started, but it should peel off easily once a corner is lifted.
- Using scissors, cut out the decals as shown above
- The cutout decals should look approximately as shown in Step 4.
- Apply desired number of base color coats.
- When the polish is still slightly tacky, but not wet, apply the decals to the nail as shown above.
- If you are starting out with an existing manicure that is already dry, apply a coat of clear polish and allow it to get tacky for decal application...
(Please excuse the extra large decals I created... they certainly don't have to be this big :) ) - Using cuticle nippers, clip the decals as close to the cuticles as possible
- Clean up the edges as needed. If you didn't clip as perfectly as you wanted, take a look at the cleanup tutorial on how to get a clean line near the cuticle. Since the decals are made of nail polish, they should easily dissolve and clean up with acetone/nail polish remover...
- Apply a top coat and enjoy :)
I hope you enjoyed this tutorial! I would love to know what you think of it...
As always, if you try this or any of my other tutorials/manicures, I would love to see your creations :)
Thanks for looking!
Anutka :)
Monday, April 16, 2012
piCture pOlish Denim with Lace
Today I went with something simple and classic... denim and lace. Denim is a lovely piCture pOlish lacquer. It is really one of those polishes that I had to see in person to appreciate. The swatches online just can't capture the true complexity of this polish. To make it classy I added lace using Wet 'n Wild French White Creme and the Shany stamp SH21.


Sunday, April 15, 2012
Sunday Stamping using Multiple Stamps Over a Gradient
After taking two weeks off from Sunday Stamping challenges, I am excited to once again participate. Every week the members of the group Adventures in Stamping vote on a challenge theme. For the first time this week there was a tie between choices, stamping over a gradient and stamping using multiple stamps. Since both won, I thought it would be fun to combine both challenges in the same manicure.


Friday, April 13, 2012
Fashion Friday: Wet 'n Wild I Need a Refresh-Mint... Dress
I have decided that my fashion inspired manicures will make their appearance on Fashion Fridays. It won't be a weekly feature since the pressure of that will kill the fun for me, but when I make something that fits the theme, I will post it on a Friday. To start out the feature I want to show you a manicure inspired by a little summer dress that I stumbled upon on StyleSalad.com via Pinterest.


Really Annoyed...
I am at a loss of words as I try to write this. I came across a blog about the Kardashians that literally copy and pasted my Kardashian Kolors review as one of their posts. The same day that I posted it! At first I was only slightly baffled thinking it was an innocent blog trying to share news related to the Kardashians and I would simply ask them to remove my content. Here is the catch though... there is no contact information on this blog, nor is there a comments section on their "post."
Then something else struck me as strange... clicking on any photo or link on their site take you to AdF.ly, which is an ad service and is equivalent to putting an ad on every single link on a blog! So not only did they copy my material, but they are trying to make money off people clicking on the photos within that post...
Take a look...
My original post here
Their copy here
Be careful clicking on any of the links within that blog unless you want to make them some money...
They publish ~50 posts per day, I'm sure all copy and pasted from around the web.
I have found more than 10 other nail polish related posts from various blogger, but I'm sure I didn't find them all. I will email who I can shortly to let them know...
I have filed a copyright infringement with Blogger and hope they will be able to do something about it.
If you find that your copyrights have been violated by someone on blogger, you can file a complaint here.
UPDATE: Thank you everyone for your support! Blogger did remove the the offending posts that complaints were filed for. The page however is still up and running...
Thanks for looking!
Anutka
Thursday, April 12, 2012
piCture pOlish Festival with Aphrodisiac
What is it about flakies that is so magical? I can't seem to get enough. I have already worn the combination of piCture pOlish Aphrodisiac and Festival twice. Both times for at least three days. That must be some sort of record for me. I even went into Sally's Beauty with this and they had the nerve to ask me if it was one of their flakies. After a gentle hint that their flakies are impossible to hunt down, I told them about a lovely brand called piCture pOlish :D


Tuesday, April 10, 2012
Tutorial Tuesday: Argyle
At some point I will catch up with all the tutorial requests from the last few weeks months, but for now I'm starting with the argyle tutorial. You can see the original manicure here. I apologize in advance for my shaky lines, but I think it still does the job of showing how to make it :)
Let me know what you think of this style of tutorial... all images in one block...

Supplies:
- Base polish (Barielle Cashmere or Loose Me)
- Acrylic paint in white and green
- Polish (or acrylic paint) in orange (used here Essie Braziliant)
- Top coat.
- Optional: Essie Pure Pearlfection for shimmer.
Steps:
1. Apply desired number of base color coats. Shown here 2 coats of Barielle Cashmere or Loose Me.
2. Using white acrylic paint, draw diagonal line from the base of the nail to one side
3. Draw a second diagonal line parallel to the first as shown above
4. Add two more lines perpendicular to the first two, creating a diamond shape
5. Using white acrylic paint fill in the diamond and triangles at each corner
6. When the acrylic paint is dry, apply a coat of Essie Braziliant over the white paint
7. Add a second coat of Essie Braziliant if needed
8. Using green acrylic paint (or nail polish) create an X across the nail
9. Add remaining green lines to complete the argyle pattern as shown above
10. Go over everything with a top coat and enjoy!
- Optional: You can add a shimmer such as Essie Pure Pearlfection prior to top coat if desired. See my original manicure for photos with and without the shimmer.
I hope you enjoyed this tutorial! Let me know what you think of it!
As always, if you give this a try, send me a link... I would love it see it :)
Thanks for looking!
Anutka :)
Monday, April 9, 2012
Barielle End of the Rainbow with Starry Sky
Today I have two more Barielle polishes to show you. A teal named End of the Rainbow and a glitter named Starry Sky. Starry Sky consists of hex shaped silver glitter in a clear base. I applied one thick coat of Starry Sky to get all the glittery goodness. It was easiest to apply by first placing a drop of polish with glitter on the nail and then spreading it around with the brush. This seemed to give me better control of where the glitter went to avoid empty spots. It is nice to just add a touch of sparkle to a manicure. I can picture it looking like a true starry sky if layered over a dark blue or black.


Sunday, April 8, 2012
Bunnies...
This manicures is not new. I actually created it for a nail art contest last year here, but I thought it would be fun to show again. Since I don't celebrate Easter, I chose not to participate in the Easter themed Sunday Stamping challenge for the Facebook group Adventures in Stamping, as I usually would. However I am enjoying seeing all their fun manicures and it reminded me of the bunnies that I see running around my neighborhood around this time of the year...
This was one my my first nail art attempts when I started this blog, so it is fun to look back. Unfortunately I don't remember what base I used for the manicure, but the art is acrylic paints...


Thanks for looking!
Anutka :)
This was one my my first nail art attempts when I started this blog, so it is fun to look back. Unfortunately I don't remember what base I used for the manicure, but the art is acrylic paints...


Thanks for looking!
Anutka :)
Saturday, April 7, 2012
Barielle Eli's Magic with Shannon's Attitude
Today I have two lovely Barielle polishes, Eli's Magic and Shannon's Attitude to show you. For some reason the combination of the two names to form a title seems to amuse me at the moment. I'm blaming it on lack of sleep...

Friday, April 6, 2012
Funky French with OPI My Pointe Exactly and Zoya Kelly Tips
When I first saw My Pointe Exactly, the sheer gray from the OPI New York City Ballet collection I knew I had to pair it with Zoya Kelly. I was really curious if the two grays would play well together. I started out with three coats of My Pointe Exactly, which you can see from the original swatches remains fairly sheer with a visible nail line. Then I taped off the nail using Scotch tape and polished the tips using Zoya Kelly. Silver lines were added with an Essence Nail Art polish in Silver Surfer. I really love the brush that comes with Silver Surfer. It is very fine and easy to work with. The black rose is actually from a nail sticker set that I ordered from Ebay. It blended well to give the look of stamping.


Thursday, April 5, 2012
Broken Computer and Other Randomness...
My computer did me a favor on Monday by breaking. Yup, you read it correctly, it did me a favor. I turned it off Monday afternoon before heading to work and when I got home at night it refused to turn on. Luckily I happen to have a computer wizard residing with me and he promptly disassembled the computer to figure out the problem. It was still in pieces on Tuesday, so instead of my original plan to catching up on blog stuff I did some much needed cleaning, IKEA visiting and dinner with friends. It is amazing what can be accomplished in a day when the computer is off. I know the blog might take a slight hit, but I plan on spending less time in front of the computer and more time in real life (for my sanity)...
Even though I managed to stay away from the computer, I couldn't stay away from nail polish. After dinner my cousin came over and asked if I would replicate my recent storks manicure for her. It is fun to create manicures like this, so I was happy to oblige. I am quite pleased with how it turned out and I think she was too. Here is the result...

Even though I managed to stay away from the computer, I couldn't stay away from nail polish. After dinner my cousin came over and asked if I would replicate my recent storks manicure for her. It is fun to create manicures like this, so I was happy to oblige. I am quite pleased with how it turned out and I think she was too. Here is the result...

Monday, April 2, 2012
OPI New York City Ballet
I may have mentioned once or twice (who am I kidding, at least a dozen times) how much I love sheer polishes. It will come as no surprise then to say how much I love the new OPI New York City Ballet collection. The collection contains five sheer jelly polishes and one glitter polish which can be layered over any of them. This may be the first collection where I can't pick favorites. I definitely foresee some french manicures in my future...


Subscribe to:
Posts (Atom)