
Tuesday, September 30, 2014
Cloudy Days Go Away!
Fall weather in Seattle is such a fickle thing. Although the sun is peeking out now, it has been pouring buckets on and off for days now. Polished by KPT Cloudy Days Go Away couldn't capture my mood or sentiments any better. I decided to create some playful nail art to go along with this beautiful polish and my cloudy days state of mind...

Polished by KPT Coupon Code
Hi Lovelies! Katherine of Polished by KPT will be re-opening her shop and launching the new Paris & Me collection that I showed you last week in just a few short hours. She was extremely generous and offered my lovely readers (yup, that's you!) a 15% off discount when using the coupon code WACKYLAKI at checkout.

Please note that the code must be applied at the time of purchase and cannot be used on prior purchases or once the purchase is finalized.
I hope you enjoy and treat yourself to some pretty polish! :)
P.S. You can see my review of the Paris & Me collection plus my previous swatches and manicures using Polished by KPT here!
Thanks for looking!
Anutka :)
Sunday, September 28, 2014
31DC2013 Day 26 - Inspired by a Pattern
Hi All! I'm continuing today with Day 26 of the 31 day challenge. The task for today was to create a manicure inspired by a pattern. I have long been wanting to stamp the houndstooth pattern, but somehow don't seem to get around to actually following through. I decided to take advantage of the opportunity and finally make it happen. Polished by KPT Fall-O-You for me is a perfect shade for the task. It reminds me of a great Fall jacket and I think the houndstooth pattern suits it well. Now if I could actually find a jacket that goes from charcoal gray a the top and gently transitions to and army or olive green at the bottom, I'd be sold...

Saturday, September 27, 2014
31DC2013 Day 25 - Inspired by Fashion
Shame on me. I just resumed the 31 Day Challenge and here I am 2 (+365?) days behind already. Have no fear though, I'm still determined to catch up or at the very least complete the rest of the challenges. Day 25 is possibly one of my favorites with a challenge to create a fashion inspired manicure. I have drawn inspiration from fashion many times and lately in particular I'm drawn to shoes. This pair of shoes has been in my 'inspiration' folder for quite some time and this was the perfect opportunity to bring it to life...

Friday, September 26, 2014
Polished by KPT Paris & Me Collection Swatches and Review
Happy Friday Lovelies! I am super excited today to share with you my review of the new Polished by KPT Fall collection named Paris & Me. The collection which features nine gorgeous lacquers will be released next week. It is definitely one you shouldn't miss. There is something for everyone here from thermal to holographic to glitter. I am incapable of picking favorites here so please pardon me while I gush...

Wednesday, September 24, 2014
31DC2013 Day 24 - Inspired by a Book
Today I would like to show you my manicure for Day 24 of the 31 Day Challenge. Now some of you might be thinking "Day 24? What happened to Days 1-23?" so let me explain. Days 1-23 are way back in September of last year when I started this challenge. I lost steam after the first three weeks and at the time thought I would finish up "soon". Well somehow "soon" turned into a full year and probably would have been even longer if a whole bunch of talented nail art bloggers and fanatics weren't in the midst of doing this challenge AGAIN! I thought for me this would be the perfect time for me to pick up where I left off and post my challenges along with them. Hopefully that will keep me motivated to complete the challenge and get that nagging voice out of my head that keeps reminding me that I left something unfinished.
The challenge for Day 24 is to create a manicure inspired by a book. I chose a fun little book titled, Everything Men Know About Women. As you can see, I was inspired by the cover because (SPOILER ALERT) all the pages in this book are blank and somehow plain white nails didn't seem like much of a challenge...

The challenge for Day 24 is to create a manicure inspired by a book. I chose a fun little book titled, Everything Men Know About Women. As you can see, I was inspired by the cover because (SPOILER ALERT) all the pages in this book are blank and somehow plain white nails didn't seem like much of a challenge...
Monday, September 22, 2014
Dazzle Dry Global Beat Fall 2014 Collection Swatches and Review
It is Monday again, which sadly means time to head back to work, but it also means that I spent a wonderful weekend relaxing and playing with polish. I've got lots to show you in the coming days, but starting this week out with the new Dazzle Dry Global Beat collection for Fall. This collection features four lacquers ready to dance their way into your heart...

Friday, September 19, 2014
Zoya Naturel Deux (2) Collection Swatches and Review
Happy Friday Everyone! Today I am excited to finally share with you my swatches of the Zoya Nautrel Deux (2) collection. This collection is a follow-up to the popular Naturel collection which came out early this year. Although the Deux collection has been available for a few months now, the Fall colors just begged me to delay swatching until the weather started to turn. I think now is the perfect time to show these beauties off to you...

Thursday, September 18, 2014
Floral Stamping
Hi! Sometimes I get so caught up in a manicure that I start to over-complicate things. Adding glitter, more colors, making decals, accenting with dots, etc that I forget how nice something clean and simple can be. Does that happen to you? Do you ever get to a certain point and think you should have stopped while you were ahead? For this manicure I did just that. I decided to stop and just enjoy a simple stamped look...

Wednesday, September 17, 2014
Press Release: Gwen Stefani for OPI
Gwen Stefani Joins OPI to Release 18 New Limited Edition Holiday Nail Lacquers

OPI announces the launch of 18 new limited edition holiday nail lacquers inspired by No Doubt singer/songwriter and L.A.M.B. designer Gwen Stefani. This seasonal collection includes an assortment of red, maroon, burgundy, and forest green hues, along with shimmer-packed silver, gold and black shades. “During the holiday season, women adopt a more glamorous beauty look,” explains Suzi Weiss-Fischmann, OPI Co-Founder & Brand Ambassador. “OPI’s 18 new shades are inspired by Gwen’s edgy, sophisticated style. There are several rich, warm reds – Gwen’s signature color – deep, jewel-toned amethyst, garnet and emerald, as well as silver and gold. I recommend wearing these festive nail lacquers to instantly accessorize party dresses and elegant winter-wear.
Tuesday, September 16, 2014
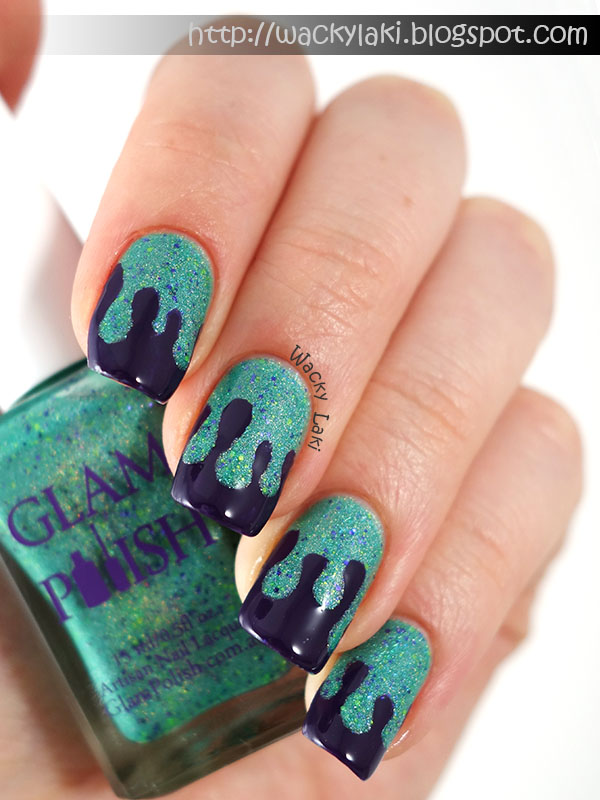
Glam Polish Frankenslime 2014
Today I would like to show you another limited edition Halloween beauty from Glam Polish. It is named Frankenslime 2014, a revised and updated version of last year's very popular Frankenslime. When it came time to play around with nail art, I just couldn't get the slime part of the name out of my head so I decided to just go with it...
Monday, September 15, 2014
Glam Polish Snoopy the Witch!
Hi Everyone! I am super tired from working all weekend, but I've still got enough energy to show you the fun Glam Polish glitter topper named Snoopy the Witch. It is one of the Halloween Limited Edition polishes which will be available for pre-order on the 17th. Inspired by the colors of the glitter in this bewitching mix, I decided to pair it up with a matching gradient...

Thursday, September 11, 2014
Select Shades of Dance Legend Rio Collection
Hi Everyone! Today I would like to show you three shades from the Dance Legend Rio collection. These neon glitter toppers add a fun twist to any manicure. They look beautiful over both light and dark colors and I think can easily be worn any time of the year. No need to hide these away when Summer ends...

Wednesday, September 10, 2014
Coca-Cola by OPI Collection Swatches and Review
Hi Everyone! Today I would like to share with you my swatches and review of the OPI Coca-Cola collection. I've had my little paws on this collection for quite a while now, but the darker hues scream Fall to me and I was rather reluctant to try them out during the hot Summer months. Now with occasional cooler days in the mix, it seems the perfect time to rock these beauties...

Tuesday, September 9, 2014
Press Release: NYC New York Color Fashion Queen Collection for Fall 2014
THE WORLD IS YOUR RUNWAY WITH THE NEW FASHION QUEEN COLLECTION
FROM NYC NEW YORK COLOR
THINK: Fun, fearless fashion for your face and nails.
WHAT IT IS: Metallic and jewel-tone beauty products that bring runway style to the street. This fall, get the designer look with the new Fashion Queen collection from NYC New York Color. With shimmering topcoats, rich polishes, and silky eye palettes, this collection is the perfect accessory for the most stylish outfit. Famous for delivering uptown style at down to Earth prices, NYC New York Color will glam up any makeup look this fall, tailor-made for those who live for all things fashion.
The latest eye-catching favorites include:
Press Release: Zoya Ultra PixieDust for Fall 2014

Meet the next generation of our best-selling textured, matte and sparkling Zoya PixieDust formula Zoya Ultra PixieDust! Three shades featuring both fine micro glitter and mega hex particles for tone on tone 3D effects. This easy glam nail is available in 3 shades in a gradient of red, wine and plum hues. No base or top coat required.
Press Release: Sally Hansen Miracle Gel
INTRODUCING MIRACLE GEL
THE REVOLUTIONARY NEW GEL MANICURE SYSTEM WITHOUT THE LIGHT

THINK: The fusion of color and science
WHAT IT IS: The first salon-quality manicure that combines pure nail color with high techno gel...exclusively from Sally Hansen. Love the high shine, glossy look of a gel manicure but could do without the complexity of LED lights, time consuming removal, and expensive price tag? Now, Sally Hansen, the leader in nail color innovation, is making manicure history with an entirely new way of thinking about long lasting nail color. Its new, patented Miracle Gel, is the first ever part lacquer, part gel manicure system that delivers up to 14 days of lasting color and shine in just 2 easy steps. Simply apply two coats of the Miracle Gel Color Coat, followed by the Miracle Gel Top Coat, to achieve the most convenient manicure, ever.
Nail Art Tutorial: Sparkly Vampire Tips
Hi Lovelies! This manicure probably didn't need a tutorial because I consider it pretty straight forward to begin with, but please correct me if I'm wrong. Would you like to see more tutorials? Less tutorials? Only for complicated techniques? I don't want to spam you with tutorials, but at the same time I'm having fun making them at the moment! :)
The tutorial goes along with a manicure that I posted yesterday inspired by the InDecisive Lacquer polish and name Sparkly Vampire. I keep thinking a vampire would love a mani like this! Or maybe it is just because the tips remind me of fangs! Who knows, but I really enjoyed wearing this and I hope you enjoy this tutorial...
Supplies used:

Instructions:
Please let me know what you think of this tutorial and as always don't hesitate to ask questions!
Thanks for looking!
Anutka :)
The tutorial goes along with a manicure that I posted yesterday inspired by the InDecisive Lacquer polish and name Sparkly Vampire. I keep thinking a vampire would love a mani like this! Or maybe it is just because the tips remind me of fangs! Who knows, but I really enjoyed wearing this and I hope you enjoy this tutorial...
Supplies used:
- Polishes: InDecisive Lacquer Sparkly Vampire, SinfulColors Black on Black
- Red hex glitter (mine is from the Born Pretty Store, part of a set. Item #3103)
Instructions:
- Apply desired number of coats of your red polish. Here I used 2 coats of InDecsive Lacquer Sparkly Vampire.
- Paint a corner of the nail using black. Depending on the length of your nails and how steep you want the final point to be, start at the edge of your nail and swipe toward the center of the tip. Don't worry if the line is not perfect since you will be covering it with glitter!
- You can do this using either the polish brush or a detail brush for more control.
- Additionally try marking a dot on the side and the tip of the nail to help guide if necessary.
- Repeat step #2 and paint the second corner of the nail. Again don't worry about making this perfect since you will be covering it up with glitter.
- Apply a coat of clear polish (to adhere the glitter) and arrange the red glitter along the edge between black and red polish as shown above, to create a glitter chevron.
- Seal with a top coat and enjoy!
Thanks for looking!
Anutka :)
** Polishes were provided to me for review by the manufacturer or their PR. **
** For more information please see the disclosure policy **
Monday, September 8, 2014
InDecisive Lacquer Sparkly Vampire
Happy Monday! I've had a busy weekend and sadly none of it was nail related. Luckily I do have a pretty manicure from last week to show you. I had been wearing the gorgeous InDecisive Lacquer Sparkly Vampire for a good part of last week before I decided to vamp it up a bit with glitter and black tips...

Friday, September 5, 2014
Nail Art Tutorial: Strawberries
Hi there once again! As promised, I have another tutorial to share with you today. I think I finally found my grove for making these and now I'm having way too much fun. The tutorial is for this cute strawberry nail art that I showed you in my last post. It is an intermediate tutorial and assumes that you know how to make a gradient. I will try to make a separate tutorial for gradients the next time I'm doing one. For now, I hope you enjoy this...
Supplies Used:

Instructions:
I will leave you with this adorable turtle vs strawberry photo because I just couldn't resist including it here. I stumbled on it while trying to look up for the proper name of the strawberry crown. It is the calyx! My motto for the day is live, learn and find adorable photos in the process...

As always, I would love to know what you think of this tutorial and don't hesitate to ask questions if something is not clear!
Thanks for looking!
Anutka :)
Supplies Used:
- Nicole by OPI Leapink for Joy, The Coral of the Story, Shaved Nice and Lay it on the Lime
- Cosmetic wedge
- Small nail art brush
Instructions:
- Start out by painting your nails using the the lightest of the two pink shades. Nicole by OPI Leapink for Joy is shown here
- Apply the two pink polishes directly onto a cosmetic wedge and tap on the nail to create a gradient. Shown here using Nicole by OPI Leapink for Joy and The Coral of the Story.
- Note: you can skip steps #2 and #3 if desired to avoid making a gradient. If you are unfamiliar with making gradients, but want to try it, you can take a look at this tutorial which explains gradients in a bit more detail.
- Using a q-tip or brush dipped in acetone clean up the cuticles (you can save this step until the end if desired).
- Apply a coat of glitter polish. Shown here with Nicole by OPI Shaved Nice
- Using a small nail art brush and green polish draw the strawberry calyx (crown) on the nail half-moon. Don't worry about making it perfect since strawberries aren't perfect either. I used Nicole by OPI Lay it on the Lime for this manicure
- Using the same detail brush and green polish, randomly dot strawberry 'seeds' on the nail
- Seal with a top coat and enjoy!
(source)
As always, I would love to know what you think of this tutorial and don't hesitate to ask questions if something is not clear!
Thanks for looking!
Anutka :)
** Polishes were provided to me for review by the manufacturer or their PR. **
** For more information please see the disclosure policy **
Seize the Summer Strawberries
Hi Everyone! Have I mentioned already that I'm not ready to part with Summer yet? Well I'm not and although I'm looking forward to the Fall colors and nail art, I'm going to stretch the Summer shades out as long as I can. This is a manicure that I created while reviewing the Nicole by OPI Seize the Summer beauties. I wanted to see if I can combine the four of them into a fun and fruity summer manicure. Initially I thought of watermelons, but I since I've done that already, these strawberries came to be...

Thursday, September 4, 2014
Nail Art Tutorial: Neon Triangles
Hi again! I guess I have been in a tutorial making mood so I'm just rolling with it. Some might be quite simple, such as this one, but I hope you enjoy them nevertheless. This is for the manicure that I showed you this morning featuring neon accent triangles. They are fun and easy to do. Try them out in different color combinations...
Supplies used:

Instructions:
Thanks for looking!
Anutka :)
Supplies used:
- InDecisive Nail Lacquer Jawbreaker
- OPI Blue it out of Proportion (also used OPI You Are so Outta Lime!, Life Gave Me Lemons, and Pink Outside the Box for the rest of the manicure)
- Striping tape
Steps:
Instructions:
- Apply desired number of coats of base color. Here I used 2 coats of InDecisive Lacquer Jawbreaker
- Arrange 2 pieces of striping tape to create a triangle at the nail half moon. Add another 2 piece of striping tape parallel to the first as shown above
- Using your desired accent color, paint inside the half moon triangle and between the striping tape. For this tutorial, I used OPI Blue it out of Proportion.
- Quickly remove the striping tape before the polish begins to dry to ensure a clean line
- Add a top coat and enjoy!
Easy peasy, right?
Please let me know if you have any questions!
Would you like to see more simple tutorials such as this?
Thanks for looking!
Anutka :)
** Polishes were provided to me for review by the manufacturer or their PR. **
** For more information please see the disclosure policy **
InDecisive Lacquer Jawbreaker
Hi Everyone! Today I would like to show you the adorable InDecisive Lacquer beauty named Jawbreaker and some nail art that I created with it. I wanted to play off the fun neon colors within Jawbreaker so I pulled each one out into a triangle accent. This is my subtle way of begging summer to stick around a little bit longer. Does it really have to go so soon?

Tuesday, September 2, 2014
Tutorial: Dotticure
Hi Lovelies! I thought I would share another tutorial today with you today. This is for a dotticure that I showed you a few months ago. I have been going through my mani archives and discovered a few tutorials that I never got around to putting together until now. I had even forgotten that I took photos for this dotticure tutorial so stumbling across it was a fun surprise.
Supplies Used:

Instructions:
Thanks for looking!
Anutka :)
Supplies Used:
- Polishes: Zoya Dot (pink base), Dillon (minty green), Hudson (lavender) and Rebel (sky blue)
- White nail polish or acrylic paint
- Dotting tool (don't have a dotting tool? Try some dotting tool alternatives)
Instructions:
- Start out by painting your nail using a base color. I used Zoya Dot for this look
- Using white nail polish or acrylic paint and a dotting tool, place dots down the center of the nail starting near the cuticles and working down toward the tip.
- You can make all the dots the same size or alternate between larger and slightly smaller dots as I attempted.
- Add another row of dots on each side of the first row as show above.
- If you chose to alternate the size of the dots in your first row then create your 2nd and 3rd row by starting opposite to the first one to ensure that each large dot is surrounded by small ones and vise versa.
- Using your first color, add a smaller dot inside each of the white dots of the first row (that was created in step #2). I used Zoya Hudson for the lavender dots.
- Repeat step #4 with a second color in one of the 'empty' white rows. I used the minty green Zoya Dillon here.
- Repeat step #4 with the final color in the last white row. I used the sky blue Zoya Rebel
- Using a small dotting tool or toothpick and white nail polish or acrylic paint, add a zig-zag of dots in between 2 rows of larger dots.
- Repeat #7 to create a zig-zag of dots between the remaining rows.
- Seal with a top coat and enjoy!
I hope you enjoyed this tutorial! Please don't hesitate to ask questions if you have any!
As always, I would love to know what you think of this tutorial.
Thanks for looking!
Anutka :)
** Polishes were provided to me for review by the manufacturer or their PR. **
** For more information please see the disclosure policy **
Subscribe to:
Posts (Atom)